First Off..
This article is for those of you out there who use Xamarin to write Android applications and want to automate the process of running your tests on an Android device. I'll show you how you can set this up with relative ease.
Here is the process we want:
- CI Build Begins
- Produces the APK file containing my tests.
- Starts up an Emulator and boots an AVD
- Installs the tests APK onto the Android Device (Emulated)
- Kicks of the tests
- Reports back the test results.
- If using Team City the test all appear nicely in the UI - otherwise the results are in STDOUT.
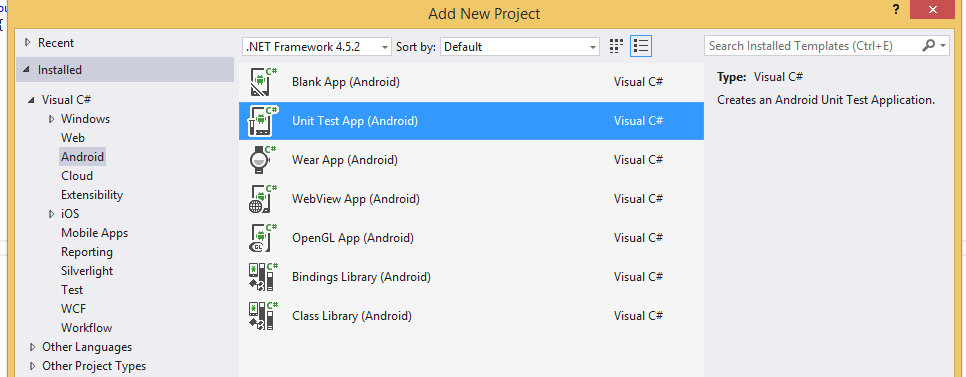
Unit Test App (Android) - and it's shortcomings.
It all begins with adding the unit tests project itself. Xamarin have provided a project type in Visual Studio called a "Unit Test App". Add one of those projects to your Solution and define some tests.
Here are some tests:
    [TestFixture]
    public class TestsSample
    {

        [SetUp]
        public void Setup() { }


        [TearDown]
        public void Tear() { }

        [Test]
        public void Pass()
        {
            Console.WriteLine("test1");
            Assert.True(true);
        }

        [Test]
        public void Fail()
        {
            Assert.False(true);
        }

        [Test]
        [Ignore("another time")]
        public void Ignore()
        {
            Assert.True(false);
        }

        [Test]
        public void Inconclusive()
        {
            Assert.Inconclusive("Inconclusive");
        }
    }
Shortcomings of Running these tests
Naturally, you may be thinking how do you now run these tests? Well by default you have to manually run them. This is an app. Starting the tests project in VSis like starting any other Android application - it should deploy the APK to your Android device, and launch the app, which then shows a UI, and you must click various buttons on said UI to run the various tests that you want to run MANUALLY.
An enormous pain in the ass..
This ofcourse, is a rediculous way forward and we need to get these automated ASAP!
The short answer
The short answer, is that we need to take a few steps to get these tests automated.. Read on..
Step 1 - The NuGet Package
I created a NuGet package called TestyDroid.
In order to write this tool, it's fair to say it has taken a fair bit of research and testing!
So - Install the NuGet package to your tests project
It contains two things. Firstly, it contains a command line executable in it's tools folder, called TestyDroid.exe. This little command line will handle spinning up an emulator, installing your tests apk, and running all of your tests and reporting the results, and lastly terminating the emulator once done.
Secondly, it contains an Android library that is added to your Android tests project as a reference. This library includes an improved base class that you will derive form instead of the default Xamrin one. We will cover this in the next step.
Step 2
After that is installed, we need to address how these tests get "launched" in the first place.
Android has the concept of "Instrumentation"
Instrumentation are basically special types, that can be launched via an intent, and can run tests.
So, in order to "start" the tests running on the Android device (after the APK) has been installed, we need to create this "Instrumentation" class in our tests project.
Add the following class to your Tests project:
namespace Xamarin.TestyDroid.TestTests
{
    [Instrumentation(Name = "xamarin.testydroid.testtests.TestInstrumentation")]
    public class TestInstrumentation : TestyDroid.Android.TestyDroidTestSuiteInstrumentation
    {

        public TestInstrumentation(IntPtr handle, JniHandleOwnership transfer) : base(handle, transfer)
        {
        }

        protected override void AddTests()
        {
            AddTest(Assembly.GetExecutingAssembly());
        }
    }

}
Imortant to note (adjust the Namespace appropriately) - the Instrumentation Attribute above the class has a "Name" property. THIS IS VERY IMPORTANT. Make sure it matches yoru namespace + class name, but with the namespace in lower case.
So if you changed the namespace of this class to MyCoolApp.Tests And you changed the Class Name of this class to MyCoolTestInstrumentation Then the Attribute above the MyCoolTestInstrumentation class should look like this:
 [Instrumentation(Name = "mycoolapp.tests.MyCoolTestInstrumentation")]
    public class MyCoolTestInstrumentation : TestyDroid.Android.TestyDroidTestSuiteInstrumentation
    {
Step 3 - Jot things down
We now need to make a note of a few variables that we will need in order to call TestyDroid.exe to run our tests.
The first thing we need is the "class path" of your tests Instrumentation. This is "Name" value of the [Instrumentation] attribute in the previous step. For example:
xamarin.testydroid.testtests.TestInstrumentation
The next thing we need is the Package name of your tests package. This you can grab from the AndroidManifest.xml file.
Here is mine:
<?xml version="1.0" encoding="utf-8"?>
<manifest xmlns:android="http://schemas.android.com/apk/res/android" package="Xamarin.TestyDroid.TestTests" android:versionCode="1" android:versionName="1.0">
	<uses-sdk />
	<application android:label="Xamarin.TestyDroid.TestTests" android:icon="@drawable/Icon"></application>
</manifest>
So the package name for my tests app is Xamarin.TestyDroid.TestTests
You will also need to know some more general paramaters about where things are on our environment:
- The path to
Adb.exe(this is in your android-sdk\platform-tools directory) - The path to
Emulator.exe(this is in your android-sdk\tools directory) - The path to your Tests APK file (I will give you a clue - it will probably be in your bin/release/ folder of your tests project!)
- The name of the AVD that you would like to be launched in the emulator and used to run the tests on.
Once you have these things, you are ready to give TestyDroid.exe a whirl!
Step 4 - Running things locally.
Armed with the information in the previous step:
- Open up a command prompt.
- CD to the tools directory of the Xamarin.TestyDroid nuget package you added to your earlier. It should be something like "..path to you solution/packages/Xamarin.TestyDroid.x.x.x/tools/"
- Run
Xamarin.TestyDroid.exewith the arguments it needs! Look here for a breakdown of all the arguments: https://github.com/dazinator/Xamarin.TestyDroid - or just execute it with the--helpargument to see the help screen.
Here is an example:
Xamarin.TestyDroid.exe -e "C:\Program Files (x86)\Android\android-sdk\tools\emulator.exe" -d "C:\Program Files (x86)\Android\android-sdk\platform-tools\adb.exe" -f "src\MyTests\bin\Release\MyTests.apk-Signed.apk" -i "AVD_GalaxyNexus_ToolsForApacheCordova" -n "MyTests" -c "mytests.TestInstrumentation" -w 120
Substitute the argument values accordingly.
You should see output similar to the following:
Starting emulator: D:\android-sdk\tools\emulator.exe -avd Xamarin_Android_API_15 -port 5554 -no-boot-anim -prop emu.uuid=013b8394-db8d-4224-a36f-889ce164f74e

Waiting until: 04/11/2015 19:21:29 for device to complete boot up..

INSTRUMENTATION_RESULT: passed=1

INSTRUMENTATION_RESULT: skipped=1

INSTRUMENTATION_RESULT: inconclusive=1

INSTRUMENTATION_RESULT: failed=1

INSTRUMENTATION_CODE: 0

Killing device: emulator-5554
Sending kill command.
OK: killing emulator, bye bye

Emulator killed.
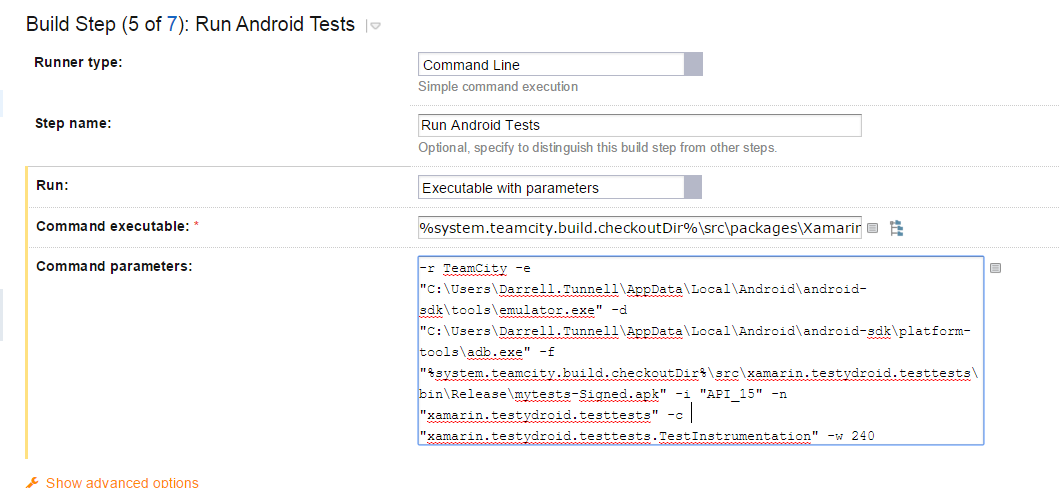
Step 5 - Running On Team City
Once you have verified you can automate the tests locally, the next step is to set up your build system to run them during your build!
TestyDroid additionally supports reporting Test results in a TeamCity format so that they show up as test results in the TeamCity ui - if that's your build system.
To configure TeamCity it's a case of:
- An MSBUILD step to build your Tests project (csproj file) such that it outputs the APK (remember to use the target
SignAndroidPackageto have the APK produced) - A command line step that calls out to Xamarin.TestyDroid.exe with the necessary arguments.
The first step is easy, but the important thing to remember is to set the target to SignAndroidPackage

That will now take care of producing the APK in the output directory for your project during your team city build.
The second step to create is the one that actually runs the tests using TestyDroid!
The follwing screenshot shows setting up a Command line step to do this:
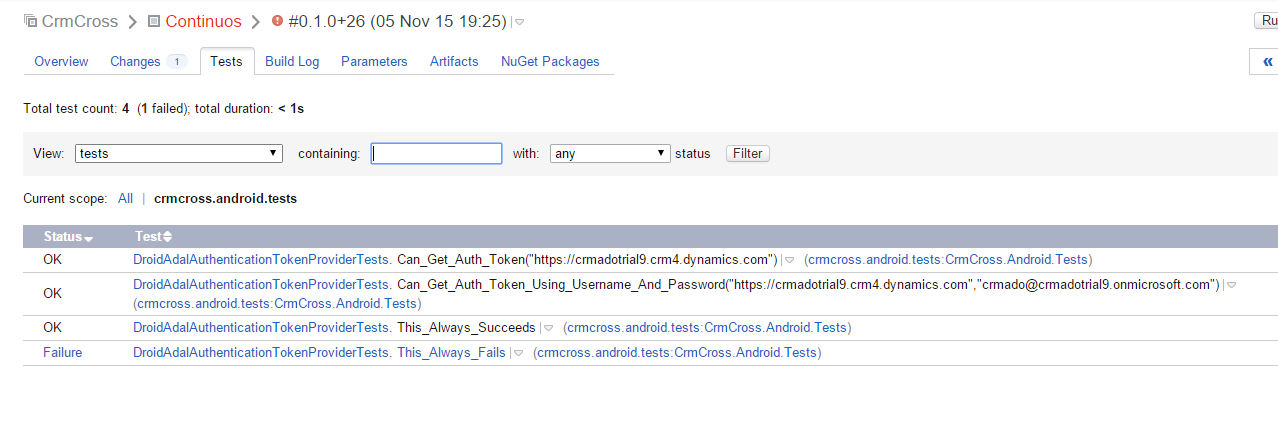
Step 6 - Admire your tests in Team City.
Now you can run a build - and if all is well - you should see your tests results added to a tests tab in Team City.
Any Questions?
I have been someone limited by time so this was fairly rushed together! If there is anything you would like me to elaborate on, please leave a comment below.
Also you can read more information about TestyDroid on Github: https://github.com/dazinator/Xamarin.TestyDroid/wiki/Getting-Started
comments powered by Disqus